
Removing air from brake lines is crucial for maintaining proper brake function and safety. When air enters the brake system, it can cause a spongy or soft brake pedal feel, reducing braking performance. While the traditional method of bleeding brakes requires a helper, there are several DIY techniques that allow you to get air out of brake lines without bleeding. In this article, we will explore the causes of air in brake lines, prepare the brake system for air removal, and guide you through the gravity bleed and pump and hold methods. We will also discuss final steps and tips for preventing air from entering the brake system in the future.

Air can enter the brake system through various means, leading to reduced braking performance and a spongy brake pedal feel. Understanding the common causes of air in brake lines is essential for preventing and addressing this issue.
Over time, the seals and hoses in the brake system can deteriorate, allowing air to enter. The (Brake Hoses, Deteriorate, From the Inside) EAV triplet highlights this issue. As brake hoses age, they can develop cracks or become porous, providing a pathway for air to infiltrate the system. Similarly, worn seals in the master cylinder or calipers can fail, leading to (Master Cylinder Seal Failure, Causes, Air in Brake Lines).
Brake fluid leaks are another common cause of air in the brake lines. (Brake Fluid Leaks, Allow, Air Into System) describes this relationship. When a leak occurs, brake fluid escapes, and air can be drawn into the system to replace the lost fluid. Leaks can occur at various points, such as brake line fittings, caliper seals, or wheel cylinder seals. Identifying and repairing leaks promptly is crucial to prevent air from entering the brake lines.
Maintaining the proper brake fluid level in the master cylinder reservoir is essential for preventing air from entering the system. If the fluid level drops too low, air can be drawn into the master cylinder when the brake pedal is released. (Brake Pad Wear, Causes, Fluid Level to Drop) illustrates this relationship. As brake pads wear down, the caliper pistons extend further, displacing more fluid. If the reservoir is not topped off regularly, the fluid level can drop, allowing air to enter the system.
Using the incorrect type of brake fluid can also contribute to air in the brake lines. (Improper Brake Fluid, Eats, Seals) and (Seal Damage, Causes, Air Intrusion) describe this cause-and-effect relationship. Different brake systems require specific types of brake fluid, such as DOT 3, DOT 4, or DOT 5. Using the wrong fluid can cause seals to deteriorate, leading to leaks and air intrusion. Always refer to your vehicle's owner's manual or consult a professional to ensure you are using the correct brake fluid for your system.

Before attempting to remove air from the brake lines, it is essential to properly prepare the brake system. This ensures a safe and effective process, minimizing the risk of introducing additional air or causing damage to the components.
Begin by parking the vehicle on a level surface and engaging the parking brake. A stable and level surface prevents the vehicle from rolling and allows for accurate brake fluid level monitoring. (Repair Attempt, Requires, Proper Tools and Equipment) emphasizes the importance of having the right setup for the task.
To access the brake calipers or wheel cylinders, remove the wheels. This step provides clear access to the bleeder screws, which are essential for the air removal process. Ensure that the vehicle is properly supported on jack stands or a lift before removing the wheels.
Locate the brake fluid reservoir under the hood and remove the cap. Check the fluid level and top off with fresh brake fluid if needed. (Brake System, Uses, Brake Fluid) highlights the importance of using the correct fluid. Maintaining the proper fluid level throughout the process is crucial to prevent air from entering the system. If the reservoir runs dry during the bleeding process, more air will be introduced, undermining your efforts.
| Preparation Step | Purpose |
|---|---|
| Park on level surface | Ensures vehicle stability and accurate fluid level monitoring |
| Remove wheels | Provides access to brake calipers or wheel cylinders |
| Check brake fluid level | Ensures proper fluid level and prevents air introduction |
The gravity bleed method is a simple and effective way to remove air from brake lines without the need for a helper. This method relies on the natural force of gravity to draw the air and fluid out of the system.
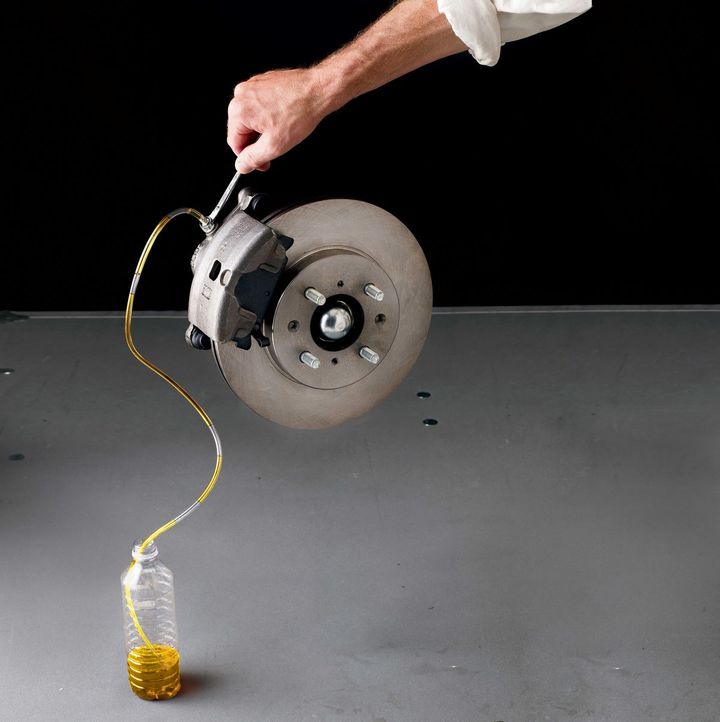
Start by attaching a clear plastic hose to the bleeder screw of the brake caliper or wheel cylinder furthest from the master cylinder. Place the other end of the hose into a container partially filled with clean brake fluid. The clear hose allows you to visually monitor the fluid and air bubbles as they exit the system.
Using a wrench, open the bleeder screw about 1/4 to 1/2 turn. As you open the screw, brake fluid and any trapped air bubbles should begin flowing out of the hose into the container. (Bleeding Brakes, Removes, Air) and (Bleeding Brakes, Restores, Firm Brake Pedal) describe the purpose and outcome of this step.
While the bleeder screw is open, gently tap on the brake lines and calipers with a rubber mallet. This action helps dislodge any trapped air pockets, allowing them to escape through the bleeder screw. Be cautious not to damage the components while tapping.
As the fluid flows out of the bleeder screw, keep a close eye on the fluid level in the master cylinder reservoir. Top off the reservoir as needed to prevent it from running dry. (Brake System, Includes, Brake Lines) and (Brake Lines, Contains, Air) emphasize the interconnected nature of the system and the importance of maintaining the proper fluid level.
Once the fluid stream flowing from the bleeder screw no longer contains air bubbles, close the bleeder screw and remove the hose. Tighten the screw securely to prevent any fluid leaks or air intrusion.
Repeat the gravity bleed process on the remaining brake calipers or wheel cylinders, working your way from the one furthest from the master cylinder to the one closest. This sequence ensures that air is effectively purged from the entire brake system.
The gravity bleed method is summarized in the following steps:
Attach clear hose to bleeder screw and place other end in container with brake fluid
Open bleeder screw 1/4 to 1/2 turn
Tap brake lines and calipers to dislodge air pockets
Monitor and maintain fluid level in master cylinder reservoir
Close bleeder screw when fluid stream is free of air bubbles
Repeat process on remaining calipers/wheel cylinders, working from furthest to closest
The pump and hold method is another technique for removing air from brake lines without bleeding, but it requires the assistance of a helper. This method involves pumping the brake pedal to build pressure and holding it while opening and closing the bleeder screw.
Have a helper sit in the driver's seat to operate the brake pedal while you work on the brake calipers or wheel cylinders. (Traditional Brake Bleeding, Requires, Helper) highlights the difference between this method and the gravity bleed method.
As with the gravity bleed method, attach a clear hose to the bleeder screw of the brake caliper or wheel cylinder furthest from the master cylinder. Place the other end of the hose in a container to catch the expelled fluid and air.
Open the bleeder screw approximately 1/4 turn. (Air, Causes, Spongy Brake Pedal) and (Air, Reduces, Braking Performance) underscore the importance of removing air from the system to restore proper brake function.
Instruct your helper to slowly press the brake pedal to the floor. As they do so, the pressure in the system will force the air and fluid out through the open bleeder screw.
While your helper holds the brake pedal firmly to the floor, close the bleeder screw. Then, have your helper release the brake pedal. (Pressure Bleeding, Uses, Force) and (Pressure Bleeding, Pushes, Air Out) describe the mechanism behind this method.
Repeat the pump and hold process on the remaining brake calipers or wheel cylinders, moving from the furthest to the closest to the master cylinder. Remember to top off the master cylinder reservoir as needed to prevent it from running dry.
| Pump and Hold Method Steps |
|---|
| 1. Assist with a helper to operate brake pedal |
| 2. Attach clear hose to bleeder screw and place other end in container |
| 3. Open bleeder screw 1/4 turn |
| 4. Helper slowly presses brake pedal to the floor |
| 5. Close bleeder screw while helper holds brake pedal down |
| 6. Helper releases brake pedal |
| 7. Repeat process on remaining calipers/wheel cylinders |
After completing the air removal process using either the gravity bleed or pump and hold method, there are a few final steps to ensure your brake system is functioning properly and safely.
With the air removed from the brake lines, the brake pedal should feel firm when depressed. Pump the brakes several times to confirm that the pedal remains firm and does not feel spongy or soft. (Repair Attempt, Requires, Basic Mechanical Skills) emphasizes the importance of verifying the repair's success.
Check the master cylinder reservoir and top off the brake fluid to the "Full" line if necessary. Replace the reservoir cap securely to prevent contamination and fluid loss.
Reinstall the wheels and torque the lug nuts to the manufacturer's specified value. Proper torque ensures the wheels are securely fastened and prevents vibrations or loosening while driving.
Before driving at highway speeds, test drive the vehicle at low speeds to confirm that the brakes are functioning properly. Apply the brakes gently and progressively to ensure smooth and effective braking. If any issues are detected, such as a soft pedal or reduced braking performance, do not continue driving and seek professional assistance.
Preventing air from entering the brake system is crucial for maintaining optimal braking performance and safety. By following a few key practices, you can minimize the risk of air infiltration and extend the life of your brake components.
Regularly check the brake fluid level in the master cylinder reservoir and top off as needed. (Brake Pad Wear, Causes, Caliper Pistons to Extend) and (Brake Pad Wear, Causes, Fluid Level to Drop) highlight the relationship between brake pad wear and fluid level. As brake pads wear down, the caliper pistons extend further, causing the fluid level to drop. Keeping the reservoir filled to the proper level prevents air from being drawn into the system.
When the brake fluid level is low, avoid pressing the brake pedal all the way to the floor. Doing so can allow air to enter the master cylinder, contaminating the entire brake system. If you suspect the fluid level is low or experience a spongy pedal, check the reservoir and top off the fluid before driving.
Over time, brake fluid absorbs moisture from the atmosphere, which can lead to corrosion and decreased braking performance. (Old Brake Fluid, Absorbs, Water) and (Water Absorption, Lowers, Boiling Point) describe this process. To prevent these issues, replace the brake fluid according to the manufacturer's recommended maintenance schedule. Fresh, uncontaminated fluid helps maintain optimal braking performance and prevents air from entering the system due to fluid degradation.
If you notice any brake fluid leaks, address them promptly to prevent air from entering the system. (Brake Fluid Leaks, Allow, Air Into System) emphasizes the direct relationship between leaks and air infiltration. Regularly inspect brake lines, hoses, calipers, and wheel cylinders for signs of leakage, such as wet spots or puddles of fluid. If a leak is detected, have it repaired by a professional mechanic to ensure the integrity of your brake system.
By following these preventive measures, you can significantly reduce the likelihood of air entering your brake lines, maintaining optimal braking performance and safety.
Removing air from brake lines without bleeding is a valuable skill for DIY enthusiasts and those who want to maintain their vehicle's braking system. By understanding the causes of air in brake lines and following the gravity bleed or pump and hold methods, you can effectively eliminate air and restore proper brake function. Remember to always prioritize safety, use the correct tools and equipment, and seek professional assistance if you encounter any issues or are unsure about the process. Regular brake maintenance, including checking fluid levels and replacing old fluid, is essential for preventing air from entering the system and ensuring reliable braking performance.
Signs of air in brake lines include a spongy or soft brake pedal feel, reduced braking performance, and an increased stopping distance. If you experience these symptoms, it's essential to address the issue promptly to ensure safe braking.
No, it is crucial to use the correct type of brake fluid specified by your vehicle's manufacturer. Using the wrong fluid can cause damage to seals and other components, leading to leaks and air intrusion.
The recommended interval for replacing brake fluid varies depending on your vehicle's make and model. Consult your owner's manual or a professional mechanic to determine the appropriate schedule for your vehicle.
To perform the gravity bleed or pump and hold methods, you will need a clear plastic hose, a container for catching the expelled fluid, a wrench to open and close the bleeder screws, and fresh brake fluid for topping off the reservoir. Having a rubber mallet for tapping the brake lines and calipers can also be helpful.
No, it is not recommended to reuse old brake fluid as it may be contaminated with air, moisture, or debris. Always dispose of the expelled fluid properly and use fresh, clean brake fluid when topping off the reservoir.
Signs of a brake fluid leak include wet spots or puddles of fluid near the brake components, such as the brake lines, calipers, or wheel cylinders. You may also notice a low fluid level in the master cylinder reservoir or a gradual decrease in braking performance.
After removing air from the brake lines, it is essential to test drive the vehicle at low speeds to ensure proper brake function before driving at highway speeds. If you notice any issues, such as a soft pedal or reduced braking performance, do not continue driving and seek professional assistance.
It is recommended to check your brake fluid level at least once a month or as specified in your vehicle's owner's manual. Regularly monitoring the fluid level can help you detect leaks or low fluid conditions early, preventing air from entering the system.
If you accidentally press the brake pedal to the floor when the fluid level is low, air may have entered the master cylinder. In this case, it is advisable to have a professional mechanic inspect and bleed the entire brake system to ensure proper function and safety.
The gravity bleed method can be used on most vehicles with hydraulic brake systems. However, some vehicles may have specific bleeding procedures or require special tools. Always consult your vehicle's owner's manual or a professional mechanic to determine the appropriate method for your make and model.
Miguel started tinkering with car radios as a teenager, fascinated by the intricate dance of wires and circuits. This passion led him to pursue a career as an automotive electrician. For the past 10 years, Miguel has tackled everything from flickering headlights to mysterious electrical gremlins. He thrives on troubleshooting electrical problems and enjoys sharing his knowledge to empower car owners to understand their vehicles better.