
An oil pan gasket is a crucial component that seals the oil pan to the engine block, preventing oil leaks. Over time, the gasket can deteriorate due to heat, pressure, and general wear and tear, leading to oil leaks. Replacing the oil pan gasket is a common maintenance task for many vehicles, and it's essential to address this issue promptly to avoid further damage to the engine.
At the heart of the matter lies the oil pan gasket, a humble yet crucial component responsible for sealing the oil pan to the engine block. This gasket is subjected to intense heat and pressure over time, causing it to degrade and crack. As it loses its ability to seal properly, oil leaks become inevitable, leaving unsightly stains on your driveway and potentially leading to more severe engine damage if left unchecked.
Common Causes of Gasket Failure:
| Cause | Explanation |
|---|---|
| Material Degradation | The rubber or cork material of the gasket dries out and cracks due to heat and pressure, compromising its sealing ability. |
| Physical Damage | Debris or improper installation can cause premature failure and leaks by damaging the gasket. |
But gasket failure isn't the only culprit. The oil pan itself can also contribute to the problem.
Oil Pan Damage:
Dents, warping, or cracks in the oil pan from road debris impacts or excessive corrosion/rust can prevent a proper seal even with a new gasket installed.
Overtightening of the oil pan bolts can warp or crack the pan over time, leading to leaks.
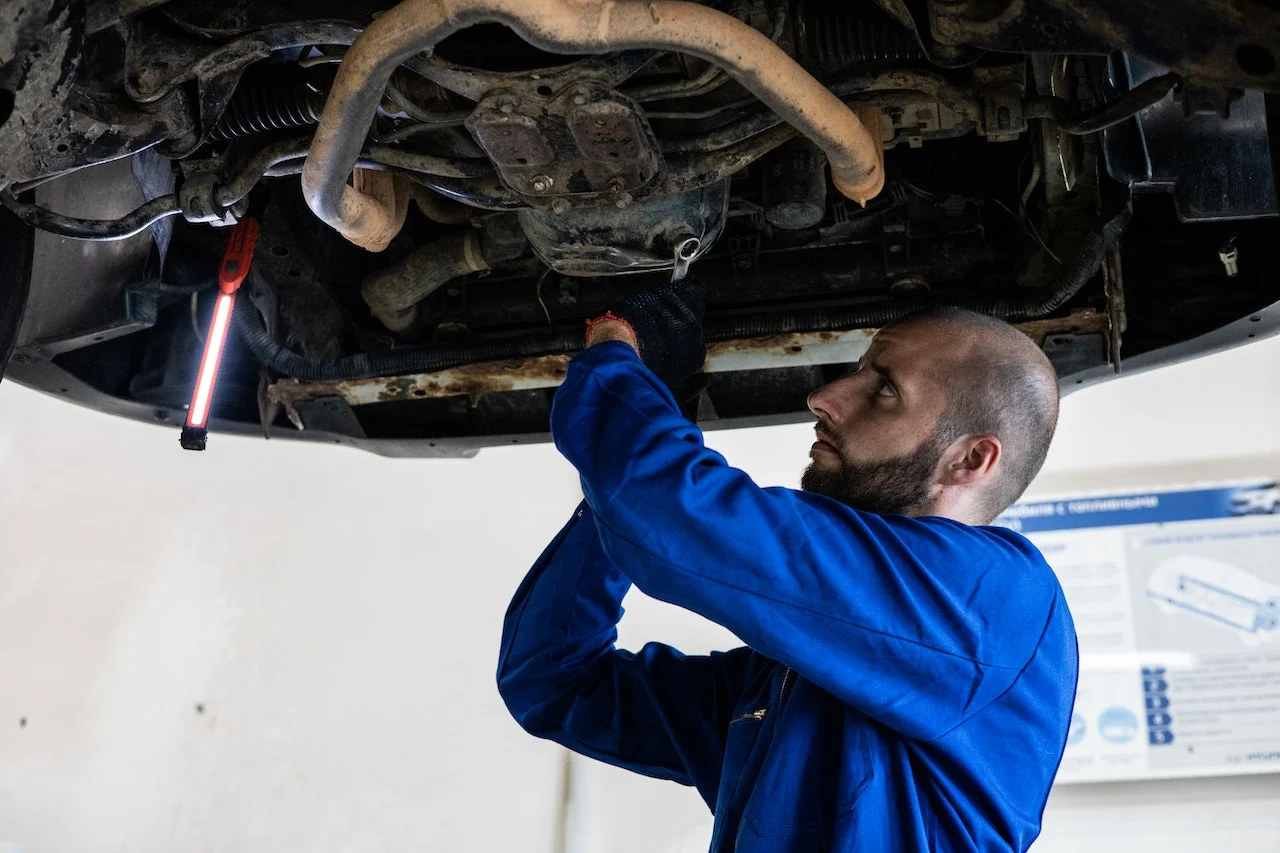
As a mechanic, I've learned that the key to addressing any automotive problem lies in proper diagnosis. When it comes to oil pan gasket leaks, the signs are often subtle but unmistakable.
Inspection Steps:
Visually inspect for oil leaks or drips under the vehicle, especially around the oil pan area.
Check engine oil level frequently, as leaks will cause low oil levels.
Use a flashlight to closely examine the oil pan and gasket area for any cracks, warping, or obvious damage when the vehicle is on a lift.
Identifying Damage:
Oil spots or puddles under the vehicle indicate an active leak that needs to be addressed.
Excessive oil consumption or frequent low oil levels point to a gasket leak.
Smoke from the engine area could mean oil is leaking onto hot exhaust components.
Once the diagnosis is complete, it's time to roll up our sleeves and get to work. The repair process involves several crucial steps:
Drain the engine oil and remove the oil pan by unbolting it from the engine block. This process can be straightforward or more involved, depending on the vehicle's design and accessibility.
Thoroughly clean the gasket surfaces on both the oil pan and engine block using a gasket scraper and solvent, ensuring a pristine surface for the new gasket to seal against.
Apply a thin bead of gasket sealant as recommended by the manufacturer.
Install the new gasket carefully, ensuring proper alignment and positioning.
Reinstall the oil pan, tightening the bolts in the specified sequence and torque settings.
Refill with new engine oil and filter, following the manufacturer's recommendations for oil type and viscosity.
If the oil pan itself is damaged, it will need to be replaced along with the gasket. This can involve additional steps, such as disconnecting exhaust pipes or engine mounts for clearance, and inspecting the oil pump pickup tube for any damage during the removal process.
Throughout my years as a mechanic, I've learned a few tricks of the trade that can make the difference between a successful repair and a recurring headache.
| Tip | Explanation |
|---|---|
| Allow Gasket Sealant to Cure | Let the gasket sealant cure for the recommended time before tightening the oil pan fully. Rushing this step can compromise the seal and lead to future leaks. |
| Use a Torque Wrench | Tighten the oil pan bolts in the proper sequence and torque settings using a torque wrench to avoid warping the pan or gasket. |
| Replace Other Gaskets/Seals | While the oil pan is off, replace any other worn or damaged gaskets or seals for a comprehensive repair. |
Prevention is better than cure, and there are several steps you can take to minimize the likelihood of future oil pan gasket issues.

Maintenance:
Follow the manufacturer's recommended oil change intervals.
Use the specified oil type and viscosity.
Inspect the undercarriage regularly for any leaks or damage from road debris.
Proper Operation:
Avoid running the engine with low oil levels, which can accelerate gasket/seal degradation.
Be cautious when driving over speed bumps or rough terrain to prevent impacts to the oil pan area.
Now, let's address the elephant in the room: the cost of an oil pan gasket replacement. On average, you can expect to pay between $400 to $600 for most vehicles. This cost typically includes:
| Cost Component | Range |
|---|---|
| Parts: Oil Pan Gasket | $90 - $160 |
| Labor | 2-3.5 hours at the shop's hourly rate |
However, the total cost can vary based on the vehicle's make, model, and engine configuration. If an oil pan replacement is required, the cost can increase further.
For those with the necessary tools and experience, tackling the job as a DIY project can save on labor charges, but it's essential to approach it with caution and follow the proper procedures.
In the world of automotive repairs, an oil pan gasket replacement may seem like a minor task, but as I've learned through experience, it's a job that demands precision, attention to detail, and a thorough understanding of the underlying components. By following the proper diagnostic and repair procedures, adhering to maintenance guidelines, and being mindful of the cost factors, you can ensure a successful repair and keep your vehicle running smoothly for years to come.
Remember, a little preventive maintenance can go a long way in avoiding costly repairs down the road. So, the next time you notice those telltale oil spots or experience frequent low oil levels, don't hesitate to bring your trusty ride to a skilled mechanic like myself. Together, we'll get to the root of the problem and have your vehicle back on the road in no time.
The main signs are oil spots or puddles under the vehicle, excessive oil consumption, and low engine oil levels. Smoke from the engine area could also indicate oil leaking onto hot exhaust components.
No, it is not recommended to drive with an oil leak as it can lead to engine damage from low oil levels or oil contamination. Address the leak promptly.
For most vehicles, the labor time is estimated at 2-3.5 hours for an experienced mechanic to complete the job properly.
Basic tools like wrenches, a torque wrench, gasket scraper, and potentially specialized tools to access the oil pan area are required.
It can be challenging, especially on some vehicle designs with limited access. Proper procedures must be followed carefully.
Common causes include material degradation from heat/age, physical damage during installation, overtightening of the oil pan bolts, and impacts to the oil pan.
Follow maintenance schedules, use the correct oil, avoid low oil levels, and be cautious of impacts when driving over rough terrain.
The typical cost range is $400-$600 for most vehicles, including parts and labor at a repair shop.
Yes, if the oil pan itself is dented, warped or cracked, it will need to be replaced along with the gasket to properly seal.
It is recommended to inspect and replace any other worn gaskets or seals in the area for a comprehensive repair job.
Sarah isn't your average gearhead. With a double major in Mechanical Engineering and Automotive Technology, she dived straight into the world of car repair. After 15 years of turning wrenches at dealerships and independent shops, Sarah joined MICDOT to share her expertise and passion for making cars run like new. Her in-depth knowledge and knack for explaining complex issues in simple terms make her a valuable asset to our team.